How to install WHMCS Theme?
Let's see how easy it is to install Croster WHMCS Theme. Installing is straightforward and can be completed in just a few steps.
System Requirements:
- The system requirement is same as WHMCS System Requirement for WHMCS latest stable release.
- You must have latest stable version of whmcs and it should be installed in Root directory along with Friendly URLs setting as Full Friendly Rewrite.
- If your WHMCS is fresh installed then you must finish whmcs configuration first, like products groups, products/services along with tlds and tlds pricing setup if you are selling domains.
- Before installation, If you are using our other WHMCS theme then you must need to remove/disable provided navigation bar hooks which are bundled with our other theme.
Make a Full Backup - We cannot stress enough how important it is to *always* take a full backup before attempting any kind of upgrade/install. Both for WHMCS and any other software you use. A full backup should be taken of both the WHMCS files and the database.
Uploading and Installing
- Log in to client area and download Croster theme.
- Unzip the contents of the zip file to a folder on your computer.
- Upload the entire folders and files in to your WHMCS root directory, which are available in 'upload' folder - if you experience problems, try uploading in binary mode. Watch the video for easy understanding .
- Login to your WHMCS admin area go to Setup > Addon Modules
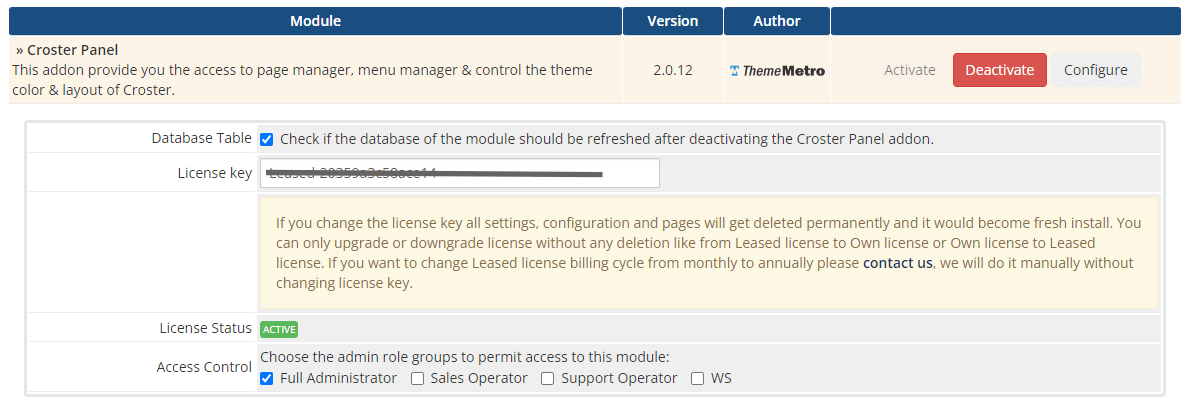
- In the addon modules page you will see the Croster Panel click activate then click configure to see the options.

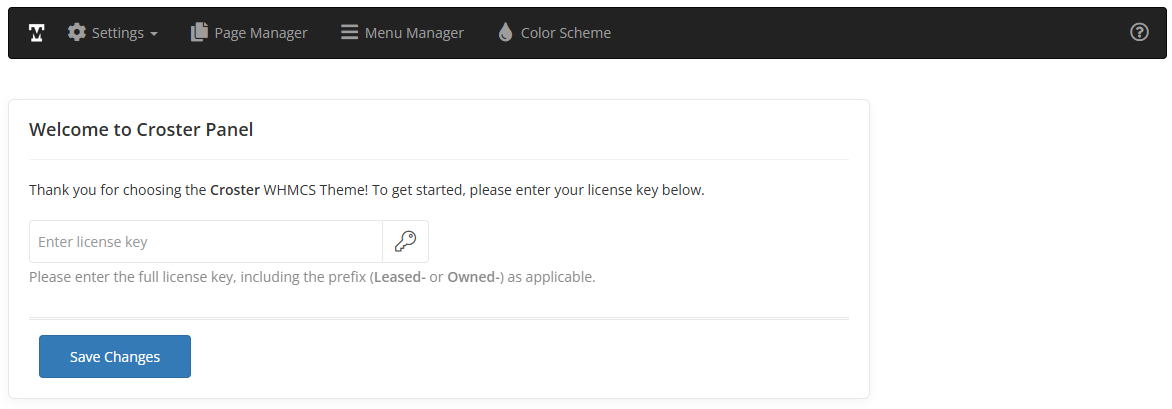
- Once done, visit the Croster Panel by click Addons >> Croster Panel

- Enter the Croster license key and press the "Save Changes" button. The license key can be found in ThemeMetro Client Portal.

- Now select the Croster template from System Settings >> General Settings >> System Theme and Croster Default order form from System Settings >> General Settings >> Ordering >> Default Order Form Template. If you don't want to active during development you may access the theme by using below link and once your website is production ready you can active them.
https://yourwhmcs.com/index.php?systpl=croster&carttpl=croster_default - Enable Color Scheme Developer mode from WHMCS admin Top Menu >> Addons >> Croster Panel >> Color Scheme then visit client area as admin after that in Color Settings Panel click Save Changes button to build updated css file. Otherwise you will see blank images in some places.
Post-installation Suggested Steps
After completing the installation, you may encounter errors or blank products on pre-created or pre-made templates pages. To resolve this, we recommend configuring your new Croster WHMCS Theme.
Key Configuration Steps:
- Products: Similar to the WHMCS order form, the Croster pricing sections are dynamic. To make your plans visible on pages, use the Page Manager to select your plans.
- If WHMCS is newly installed and no plans or packages have been added yet, you must add them first. Otherwise, the Page Manager will display an empty plan list.
- The lowest product pricing from each group.
- The description from WHMCS Admin >> Products/Services >> Product Groups.
By following these steps, you’ll ensure your Croster WHMCS Theme is fully functional and optimized for visibility and usability.